
Building Custom Leaflet Control Widgets for Interactive Spatial Filtering: Introduction
1.Building Custom Leaflet Control Widgets for Interactive Spatial Filtering: Introduction
Leaflet provides built-in map controls for zooming, layer selection, scale display, and attribution. These controls are essential for navigation, but advanced Web GIS applications often require more specialized interactions.
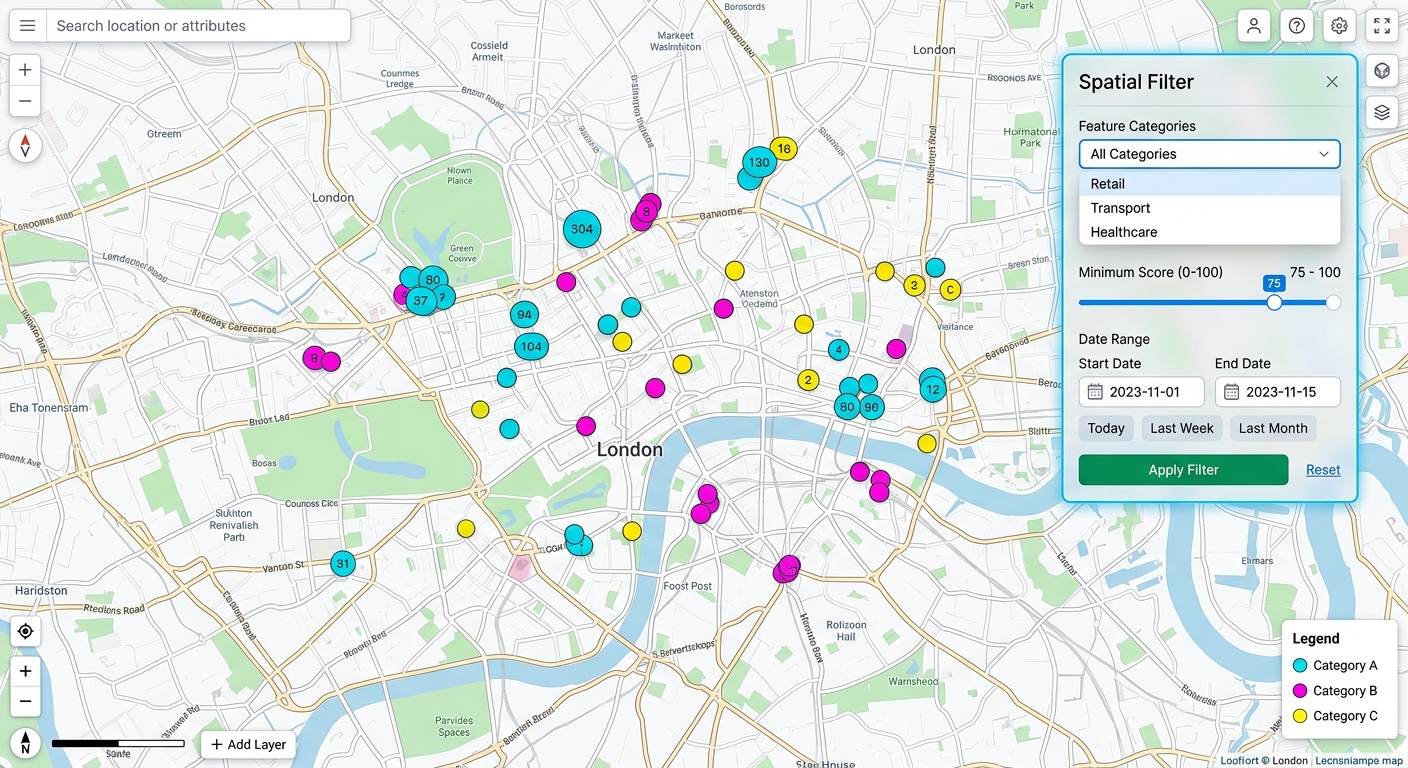
Consider a web mapping application used to monitor environmental observations, public facilities, or infrastructure projects. Users might need to filter features by category, minimum inspection score, observation date, or another attribute stored in a GeoJSON dataset.
Without a dedicated interface, users may need to rely on hard-coded filters, external forms, or repeated backend requests. A custom Leaflet control can integrate these operations directly into the map interface.
A custom control is a DOM-based interface component positioned within the map container. It can include dropdown menus, date pickers, sliders, buttons, checkboxes, and dynamic result summaries.
By extending L.Control, developers can create reusable components that follow Leaflet’s control lifecycle and can be added or removed programmatically.
This tutorial builds a reusable spatial-filter widget with three filtering options:
- Category filtering: Display features belonging to a selected category.
- Numeric filtering: Display features whose attribute value meets a minimum threshold.
- Date-range filtering: Restrict visible features to a specified observation period.
The tutorial uses Leaflet 1.9.4, standard JavaScript, CSS, and GeoJSON. It demonstrates how to preserve the original dataset, apply multiple filters simultaneously, and update the displayed features without reloading the page.
Official documentation: Leaflet API reference and Using GeoJSON with Leaflet.
2. Setting Up the Leaflet Control Environment
2.1. Understand the L.Control lifecycle
A custom Leaflet control typically implements two lifecycle methods:
| Method | Responsibility |
|---|---|
onAdd(map) |
Creates the control’s HTML interface and initializes its event listeners |
onRemove(map) |
Cleans up event listeners and references when the control is removed |
The onAdd() method must return the HTML element that Leaflet should position on the map. Leaflet places the control in the specified corner based on its position option.
A control can be implemented using Leaflet’s L.Control.extend() mechanism or modern JavaScript class syntax. This tutorial uses a native ES6 class extending L.Control, which is compatible with the Leaflet 1.9.4 class implementation.
The basic pattern is:
class SpatialFilterControl extends L.Control {
  constructor(options = {}) {
    super(options);
  }

  onAdd(map) {
    const container = L.DomUtil.create(
      "div",
      "spatial-filter-control"
    );

    return container;
  }

  onRemove(map) {
    // Release event listeners and references here.
  }
}
The super(options) call initializes the inherited Leaflet control options. For example, { position: "topright" } determines where the widget appears.
2.2. Create the project structure
For this tutorial, use a simple project:
leaflet-spatial-filter/
├── index.html
├── style.css
└── app.js
The HTML file loads Leaflet and defines the map container. The stylesheet controls the widget’s appearance, while the JavaScript file contains the demonstration data, map layers, and custom control class.
For a quick prototype, the project can be served with a local development server, such as the VS Code Live Server extension.
2.3. Load Leaflet and initialize the map
Create index.html:
<!DOCTYPE html>
<html lang="en">
<head>
  <meta charset="UTF-8">

  <meta
    name="viewport"
    content="width=device-width, initial-scale=1.0"
  >

  <title>Custom Leaflet Spatial Filter</title>

  <!-- Leaflet stylesheet -->
  <link
    rel="stylesheet"
    href="https://unpkg.com/leaflet@1.9.4/dist/leaflet.css"
  >

  <!-- Application styles -->
  <link rel="stylesheet" href="style.css">
</head>

<body>
  <div id="map" aria-label="Interactive spatial map"></div>

  <!-- Leaflet JavaScript library -->
  <script src="https://unpkg.com/leaflet@1.9.4/dist/leaflet.js"></script>

  <!-- Application logic -->
  <script src="app.js"></script>
</body>
</html>
The HTML contains a full-page map and loads the Leaflet library before the application JavaScript.
Next, create style.css:
/* Make the map occupy the available browser viewport. */
html,
body {
  width: 100%;
  height: 100%;
  margin: 0;
  font-family: Arial, sans-serif;
}

#map {
  position: absolute;
  inset: 0;
  min-height: 100%;
  background: #e5e7eb;
}

/* Main custom control container. */
.spatial-filter-control {
  width: 290px;
  max-width: calc(100vw - 60px);
  max-height: calc(100vh - 40px);
  overflow-y: auto;

  padding: 16px;
  box-sizing: border-box;

  background: #ffffff;
  color: #1f2937;
  border: 1px solid #d1d5db;
  border-radius: 9px;

  box-shadow: 0 3px 14px rgba(0, 0, 0, 0.18);
  font-size: 14px;
}

/* Control heading and explanatory text. */
.spatial-filter-control h2 {
  margin: 0 0 8px;
  font-size: 18px;
}

.spatial-filter-control p {
  margin: 8px 0;
  line-height: 1.45;
}

/* Each input receives its own vertically spaced field. */
.sf-field {
  margin: 14px 0;
}

.sf-field label {
  display: block;
  margin-bottom: 6px;
  font-weight: 600;
}

.spatial-filter-control select,
.spatial-filter-control input[type="date"] {
  display: block;
  width: 100%;
  min-height: 40px;
  padding: 8px;

  border: 1px solid #9ca3af;
  border-radius: 5px;
  background: #ffffff;

  box-sizing: border-box;
  font: inherit;
}

.spatial-filter-control input[type="range"] {
  width: 100%;
  margin: 8px 0;
  cursor: pointer;
}

.sf-range-value {
  font-weight: 700;
}

/* Group the actions consistently. */
.sf-actions {
  display: flex;
  gap: 8px;
  margin-top: 14px;
}

.spatial-filter-control button {
  min-height: 42px;
  padding: 9px 12px;
  border: 0;
  border-radius: 5px;

  font: inherit;
  font-weight: 600;
  cursor: pointer;
}

.sf-apply {
  flex: 1;
  color: #ffffff;
  background: #2563eb;
}

.sf-reset {
  color: #1f2937;
  background: #e5e7eb;
}

.spatial-filter-control button:hover {
  filter: brightness(0.95);
}

.spatial-filter-control button:focus-visible,
.spatial-filter-control input:focus-visible,
.spatial-filter-control select:focus-visible {
  outline: 3px solid #60a5fa;
  outline-offset: 2px;
}

/* Visible status and validation feedback. */
.sf-status {
  padding-top: 8px;
  border-top: 1px solid #e5e7eb;
  overflow-wrap: anywhere;
}

.sf-status.is-error {
  color: #b91c1c;
}

/* Prevent the widget from overwhelming a small screen. */
@media (max-width: 600px) {
  .spatial-filter-control {
    width: min(270px, calc(100vw - 60px));
    max-height: 48vh;
    padding: 12px;
    font-size: 13px;
  }

  .spatial-filter-control h2 {
    font-size: 16px;
  }

  .sf-actions {
    flex-wrap: wrap;
  }
}
The CSS keeps the control visually distinct from the basemap, supplies sufficiently large touch targets, and allows the panel to scroll when its contents exceed the available screen height.
3. Step-by-Step Code Walkthrough
Step 1: Prepare the GeoJSON data and map layers
The widget needs a collection of features to filter. Each feature must contain the attributes used by the controls.
For this example, every feature has a category, a numeric score, and an observation date. The point coordinates and facility names below are illustrative demonstration data rather than a verified inventory.
Create app.js and begin with the following code:
// --------------------------------------------------
// 1. Demonstration GeoJSON dataset
// --------------------------------------------------
const observationData = {
type: "FeatureCollection",
features: [
{
type: "Feature",
properties: {
name: "Demo Clinic A",
category: "clinic",
score: 82,
observed: "2026-02-10"
},
geometry: {
type: "Point",
coordinates: [36.8219, -1.2864]
}
},
{
type: "Feature",
properties: {
name: "Demo School B",
category: "school",
score: 64,
observed: "2026-05-14"
},
geometry: {
type: "Point",
coordinates: [36.8040, -1.2675]
}
},
{
type: "Feature",
properties: {
name: "Demo Market C",
category: "market",
score: 48,
observed: "2026-06-01"
},
geometry: {
type: "Point",
coordinates: [36.7875, -1.2925]
}
},
{
type: "Feature",
properties: {
name: "Demo Park D",
category: "park",
score: 72,
observed: "2026-04-22"
},
geometry: {
type: "Point",
coordinates: [36.8110, -1.3001]
}
},
{
type: "Feature",
properties: {
name: "Demo Clinic E",
category: "clinic",
score: 91,
observed: "2026-08-03"
},
geometry: {
type: "Point",
coordinates: [36.8190, -1.2637]
}
},
{
type: "Feature",
properties: {
name: "Demo School F",
category: "school",
score: 35,
observed: "2025-12-18"
},
geometry: {
type: "Point",
coordinates: [36.7750, -1.2825]
}
}
]
};
// --------------------------------------------------
// 2. Initialize the Leaflet map
// --------------------------------------------------
const map = L.map("map").setView(
[-1.2864, 36.8219],
12
);
// Add an OpenStreetMap basemap.
// Keep the attribution visible and comply with the
// provider's tile usage policy.
L.tileLayer("https://tile.openstreetmap.org/{z}/{x}/{y}.png", {
maxZoom: 19,
attribution:
'© <a href="https://www.openstreetmap.org/copyright">' +
"OpenStreetMap</a> contributors"
}).addTo(map);
// --------------------------------------------------
// 3. Create the GeoJSON display layer
// --------------------------------------------------
const categoryColors = {
clinic: "#dc2626",
school: "#2563eb",
market: "#d97706",
park: "#16a34a"
};
const observationLayer = L.geoJSON(observationData, {
// Convert GeoJSON point features into circle markers.
pointToLayer: function (feature, latlng) {
const category = feature.properties.category;
return L.circleMarker(latlng, {
radius: 7,
color: "#ffffff",
weight: 1.5,
fillColor: categoryColors[category] || "#6b7280",
fillOpacity: 0.9
});
},
// Attach a popup to each displayed feature.
onEachFeature: function (feature, layer) {
const properties = feature.properties;
// Construct the popup using DOM nodes and textContent
// instead of inserting untrusted properties as HTML.
const content = document.createElement("div");
const title = document.createElement("strong");
title.textContent = properties.name || "Unnamed feature";
const details = document.createElement("p");
details.textContent =
`Category: ${properties.category}; ` +
`Score: ${properties.score}; ` +
`Observed: ${properties.observed}`;
content.append(title, details);
layer.bindPopup(content);
}
}).addTo(map);Why preserve the original dataset?
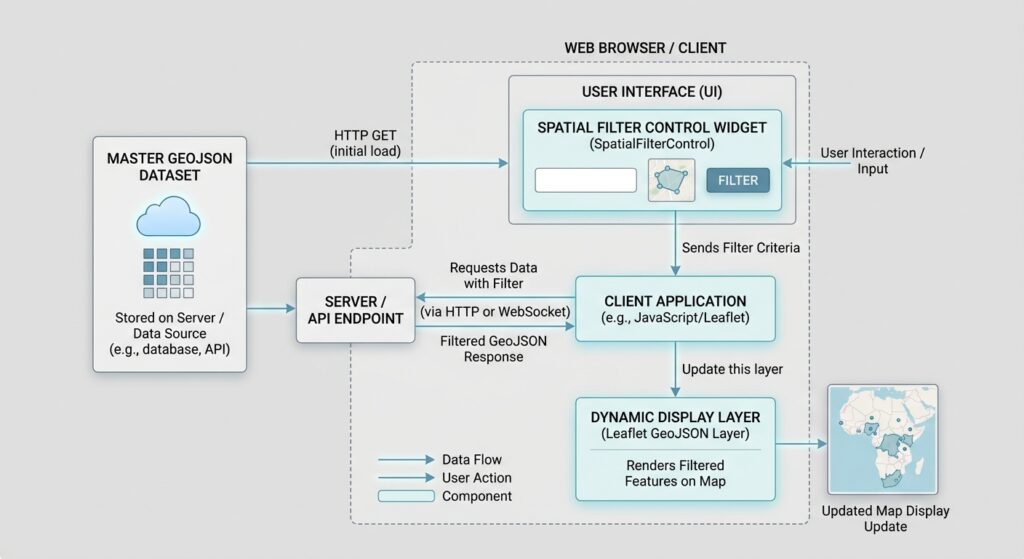
observationData remains the master collection, while observationLayer contains the features currently displayed on the map.
The distinction is important. Once a feature has been removed from the display layer, the application must still retain access to its original geometry and attributes so it can restore that feature when the user changes or resets the filters.
Step 2: Create the custom L.Control subclass
The next step is to encapsulate the interface and filtering logic inside a reusable control class.
Add the following code after the map and GeoJSON layer initialization.
// Generates a unique ID prefix for each control instance.
let filterControlCounter = 0;

class SpatialFilterControl extends L.Control {
  constructor(options = {}) {
    super(options);

    if (!options.data || !Array.isArray(options.data.features)) {
      throw new Error(
        "SpatialFilterControl requires a GeoJSON FeatureCollection."
      );
    }

    if (!options.layer) {
      throw new Error(
        "SpatialFilterControl requires a target Leaflet layer."
      );
    }

    // Keep the authoritative dataset separate from the display layer.
    this._sourceData = options.data;
    this._targetLayer = options.layer;

    // Generate distinct IDs if more than one control is instantiated.
    this._id = `sf-${++filterControlCounter}`;

    // Keep stable function references for event registration/removal.
    this._boundApplyFilters = this._applyFilters.bind(this);
    this._boundResetFilters = this._resetFilters.bind(this);
  }

  onAdd(map) {
    // Create the element Leaflet will place on the map.
    const container = L.DomUtil.create(
      "section",
      "spatial-filter-control"
    );

    container.setAttribute(
      "aria-label",
      "Spatial feature filtering"
    );

    const prefix = this._id;

    // These strings contain static markup and internally generated IDs.
    // User-supplied feature properties are not inserted into this HTML.
    container.innerHTML = `
      <h2>Spatial Filter</h2>

      <p>Filter the displayed observations by their attributes.</p>

      <div class="sf-field">
        <label for="${prefix}-category">
          Feature category
        </label>

        <select id="${prefix}-category">
          <option value="all">All categories</option>
          <option value="clinic">Clinic</option>
          <option value="school">School</option>
          <option value="market">Market</option>
          <option value="park">Park</option>
        </select>
      </div>

      <div class="sf-field">
        <label for="${prefix}-score">
          Minimum score:
          <output id="${prefix}-score-value">0</output>
        </label>

        <input
          id="${prefix}-score"
          type="range"
          min="0"
          max="100"
          step="5"
          value="0"
        >
      </div>

      <div class="sf-field">
        <label for="${prefix}-start">Start date</label>
        <input id="${prefix}-start" type="date">
      </div>

      <div class="sf-field">
        <label for="${prefix}-end">End date</label>
        <input id="${prefix}-end" type="date">
      </div>

      <div class="sf-actions">
        <button type="button" class="sf-apply">
          Apply filters
        </button>

        <button type="button" class="sf-reset">
          Reset
        </button>
      </div>

      <p
        id="${prefix}-status"
        class="sf-status"
        role="status"
        aria-live="polite"
      >
        Showing all observations.
      </p>
    `;

    // Cache the input elements for efficient access.
    this._categoryInput =
      container.querySelector(`#${prefix}-category`);

    this._scoreInput =
      container.querySelector(`#${prefix}-score`);

    this._scoreOutput =
      container.querySelector(`#${prefix}-score-value`);

    this._startInput =
      container.querySelector(`#${prefix}-start`);

    this._endInput =
      container.querySelector(`#${prefix}-end`);

    this._status =
      container.querySelector(`#${prefix}-status`);

    this._applyButton =
      container.querySelector(".sf-apply");

    this._resetButton =
      container.querySelector(".sf-reset");

    // Prevent control interactions from triggering map interactions.
    L.DomEvent.disableClickPropagation(container);
    L.DomEvent.disableScrollPropagation(container);

    // The slider updates its displayed value immediately.
    this._scoreInput.addEventListener(
      "input",
      this._updateScoreLabel,
      this
    );

    // Apply can be triggered by button click or keyboard activation.
    this._applyButton.addEventListener(
      "click",
      this._boundApplyFilters
    );

    this._resetButton.addEventListener(
      "click",
      this._boundResetFilters
    );

    // Enable Enter or Space activation when the widget itself
    // is focused. Native form controls already handle their keys.
    container.setAttribute("tabindex", "-1");

    // Retain the container for lifecycle cleanup.
    this._container = container;

    return container;
  }

  onRemove(map) {
    // Remove listeners added to the controls.
    if (this._scoreInput) {
      this._scoreInput.removeEventListener(
        "input",
        this._updateScoreLabel,
        this
      );
    }

    if (this._applyButton) {
      this._applyButton.removeEventListener(
        "click",
        this._boundApplyFilters
      );
    }

    if (this._resetButton) {
      this._resetButton.removeEventListener(
        "click",
        this._boundResetFilters
      );
    }

    // Release cached DOM references.
    this._container = null;
    this._categoryInput = null;
    this._scoreInput = null;
    this._scoreOutput = null;
    this._startInput = null;
    this._endInput = null;
    this._status = null;
    this._applyButton = null;
    this._resetButton = null;
  }

  _updateScoreLabel() {
    this._scoreOutput.textContent = this._scoreInput.value;
  }

  _applyFilters() {
    // Implemented in Step 3.
  }

  _resetFilters() {
    // Implemented in Step 4.
  }
}
The constructor validates the inputs required by the widget. It also retains the master FeatureCollection and display layer as instance properties.
The onAdd() method builds the DOM interface and stores references to the elements used by the filtering logic. The onRemove() method releases listeners and references, preventing stale control elements from continuing to trigger the application after removal.
Important implementation detail: The input event is fired continuously as a range slider moves. The example updates the score label continuously but applies the filter when the user presses Apply. This avoids rebuilding the GeoJSON layer for every small slider movement.
Step 3: Connect DOM events to the filtering logic
The control now has an interface, but it still needs to translate user input into a filtering operation.
Add the following event listeners inside onAdd(), replacing the existing event setup for the score input if you prefer a live preview:
// Category and date changes can apply immediately.
this._categoryInput.addEventListener(
  "change",
  this._boundApplyFilters
);

this._startInput.addEventListener(
  "change",
  this._boundApplyFilters
);

this._endInput.addEventListener(
  "change",
  this._boundApplyFilters
);

// Range slider changes its label continuously.
// Press Apply to execute the spatial attribute filter.
this._scoreInput.addEventListener(
  "input",
  this._updateScoreLabel.bind(this)
);
For this implementation, choose one of two consistent interaction patterns:
- Apply-to-filter: Category and date changes can trigger a filter immediately, while the score slider requires Apply.
- All-inputs-live: Make the slider, category, and date controls call
_boundApplyFiltersdirectly.
For a consistent production interface, I recommend applying all filters through the Apply button. You can adjust the listeners to match that behavior by removing the immediate category and date listeners and leaving only the button listener.
Now implement _applyFilters() inside the class:
_applyFilters() {
  const category = this._categoryInput.value;

  const minimumScore = Number(this._scoreInput.value);

  const startDate = this._startInput.value;
  const endDate = this._endInput.value;

  // Clear earlier validation errors.
  this._startInput.setAttribute("aria-invalid", "false");
  this._endInput.setAttribute("aria-invalid", "false");
  this._status.classList.remove("is-error");

  // Date inputs use ISO format: YYYY-MM-DD.
  // In this format, lexical comparison is chronological comparison.
  if (startDate && endDate && startDate > endDate) {
    this._startInput.setAttribute("aria-invalid", "true");
    this._endInput.setAttribute("aria-invalid", "true");

    this._status.textContent =
      "The start date must not be after the end date.";

    this._status.classList.add("is-error");

    // Keep the previous map results until the user corrects the dates.
    return;
  }

  // Evaluate each original feature against every active filter.
  const filteredFeatures = this._sourceData.features.filter(
    (feature) => {
      const properties = feature.properties || {};

      // FILTER 1: Category
      if (
        category !== "all" &&
        properties.category !== category
      ) {
        return false;
      }

      // FILTER 2: Minimum numeric score
      const score = Number(properties.score);

      if (!Number.isFinite(score) || score < minimumScore) {
        return false;
      }

      // FILTER 3: Inclusive date range
      // Missing dates are excluded whenever a date bound is supplied.
      const observed = properties.observed || "";

      if (startDate && (!observed || observed < startDate)) {
        return false;
      }

      if (endDate && (!observed || observed > endDate)) {
        return false;
      }

      return true;
    }
  );

  // Replace the displayed features with the filtered collection.
  // The master dataset remains unchanged.
  this._targetLayer.clearLayers();

  this._targetLayer.addData({
    type: "FeatureCollection",
    features: filteredFeatures
  });

  // Report how many features passed every active condition.
  this._status.textContent =
    `Showing ${filteredFeatures.length} of ` +
    `${this._sourceData.features.length} observations.`;
}
Understanding the filter logic
The filtering expression uses JavaScript’s Array.prototype.filter() method to evaluate each feature.
A feature is retained only when all three conditions are satisfied:
[
F(c,s,d)=C(c)\land S(s)\land D(d)
]
Here:
- (C(c)) is the category condition.
- (S(s)) is the minimum-score condition.
- (D(d)) is the date-range condition.
The logical AND operator means the output contains only features meeting every active requirement.
For example, a user could select the clinic category, set the minimum score to 70, and specify an observation period from 1 January 2026 to 30 June 2026.
The displayed dataset would then contain only clinic features with scores of at least 70 and dates falling within the specified interval.
Why use clearLayers() and addData()?
Leaflet’s GeoJSON filter option is evaluated when features are added. Changing the original filter callback does not automatically reevaluate features already present in the layer. Rebuilding the display from the original FeatureCollection avoids this problem. See the official GeoJSON guide.
Because the data used here is small, rebuilding the layer is straightforward. For large datasets or frequent updates, more selective approaches may be preferable.
Step 4: Implement Reset and register the control on the map
A practical filtering widget needs a predictable way to restore the original map display.
Add the following method to the class:
_resetFilters() {
  // Restore the default control values.
  this._categoryInput.value = "all";
  this._scoreInput.value = "0";
  this._startInput.value = "";
  this._endInput.value = "";

  // Synchronize the slider label with the selected value.
  this._updateScoreLabel();

  // Reapply the default filter to restore all valid features.
  this._applyFilters();
}
Then replace the placeholder method bodies in Step 2 with the implementations from Steps 3 and 4.
Finally, create and register the control after the SpatialFilterControl class definition:
// Instantiate the widget and attach it to the map.
const spatialFilter = new SpatialFilterControl({
  position: "topright",
  data: observationData,
  layer: observationLayer
});

spatialFilter.addTo(map);
The position option places the widget in the top-right control area. Other valid Leaflet positions are topleft, bottomleft, and bottomright.
The control can also be removed and restored dynamically:
// Remove the custom widget from the map.
map.removeControl(spatialFilter);

// Reattach the same control instance when needed.
spatialFilter.addTo(map);
When reattached, onAdd() creates a fresh interface, and the control can reconnect its listeners. The master data and feature layer remain separate, so removing the control does not erase the source dataset.
Step 5: Understand filtering versus styling
Feature removal is suitable when filtered-out features should no longer be displayed or interactable.
However, some applications need to preserve every feature on the map and distinguish filtered results visually. In that case, setStyle() can be useful for vector paths, including polygons, polylines, and circle markers.
For example, to visually emphasize a selected feature:
function highlightLayer(layer) {
  layer.setStyle({
    color: "#f97316",
    weight: 3,
    fillOpacity: 0.9
  });
}
To restore a GeoJSON layer’s original style, use its resetStyle() method:
geoJsonLayer.resetStyle(layer);These operations are useful for highlighting, but changing opacity is not the same as removing a feature from the map. Transparent features may remain interactive, depending on their layer type and event configuration.
For an actual spatial filter, removal and readdition—or the maintenance of separate filtered and unfiltered layers—usually provides clearer behavior.
4. Testing and Debugging Responsiveness
Once the widget is registered, test both its filtering behavior and its integration with Leaflet.
4.1. Test the filter combinations
Load the application and verify the following scenarios:
| Test | Expected outcome |
|---|---|
| All categories, score 0, no dates | All six demonstration features are displayed |
| Category set to clinic | Only clinic features remain |
| Minimum score set to 70 | Only features with scores of at least 70 remain |
| Date range specified | Features outside the inclusive range are excluded |
| Multiple conditions combined | Only features meeting all conditions remain |
| Start date after end date | A validation message appears and previous results are preserved |
| Reset clicked | All original demonstration features return |
If a feature disappears unexpectedly, inspect its properties object. For example, a numeric score stored as an empty string, a missing observation date, or a category that differs in capitalization may change whether that feature passes the filter.
4.2. Prevent map interactions from interfering with the widget
Controls sit inside the map container, so clicks and scroll events can propagate to the map unless handled appropriately.
The following calls prevent common interaction conflicts:
L.DomEvent.disableClickPropagation(container);
L.DomEvent.disableScrollPropagation(container);
They help prevent a control click from being interpreted as a map click or a control scroll from zooming the map. They do not replace testing of keyboard navigation or touch interactions.
4.3. Check desktop and mobile layouts
On desktop browsers, check that the control does not overlap important map content, that the inputs remain readable, and that Apply and Reset buttons work with a mouse and keyboard.
On mobile devices, verify that the widget fits within the viewport, that the page remains navigable when the control becomes scrollable, and that date pickers open and close correctly. Test both portrait and landscape orientations.
Use browser developer tools to simulate narrower screens and inspect console errors. Confirm that the page does not introduce horizontal scrolling.
For production work, also test keyboard focus, screen-reader status announcements, slow connections, missing or malformed GeoJSON, and repeated control removal and reattachment.
5. Performance and Production Considerations
The sample application deliberately uses a simple filtering workflow. For larger datasets, the implementation should be adapted to the expected feature count and interaction frequency.
Avoid repeatedly rebuilding very large layers. Calling clearLayers() followed by addData() recreates all displayed feature layers and can become expensive when thousands of geometries are processed. Consider using a spatial database or API for the initial subset, separate layers for filtered results, or vector tiles for large datasets.
Debounce live filtering. If every slider movement triggers a full filtering operation, rapid input can cause unnecessary work. A short debounce delay, request-animation-frame scheduling, or an explicit Apply button can improve responsiveness.
Validate incoming attributes. Ensure numeric scores are finite numbers and dates use a consistent format. Normalize category values where necessary, and specify how missing values should behave.
Keep the source of truth separate. Do not attempt to reconstruct the full dataset from only the visible features. Once features are removed from the display layer, they may no longer be available there. Retaining the master GeoJSON collection makes filter changes reversible.
Use safe DOM handling. Feature attributes from external sources should not be injected into HTML strings. Use textContent, DOM elements, or an appropriate sanitization strategy for dynamic content such as popups.
Choose the appropriate data architecture. Client-side filtering is suitable for smaller datasets and interactive exploration. When the data is too large to download, calculations are expensive, or access permissions are required, server-side filtering or a hybrid approach may be more appropriate.
6. Conclusion
Custom Leaflet controls let developers integrate application-specific filtering into an interactive web map. By extending L.Control, the widget can own its interface, manage its event listeners, and be added or removed through Leaflet’s standard control API.
This tutorial demonstrated a reusable widget that combines category filtering, numeric thresholds, and date ranges. Its main architectural principle is to preserve the original GeoJSON dataset and rebuild the display layer from the filtered feature collection.
The same pattern can be extended to administrative boundary selection, land-cover classification, asset inspection, environmental monitoring, or any application where users need to explore spatial data through a custom interface.
For a production application, the most important next steps are to validate the incoming data, maintain accessible and responsive controls, and select an appropriate filtering architecture for the size and complexity of the dataset.